DS-VR
This guide will walk you through the features of your 3D MIDI sequencer. You can create looping patterns, connect to external MIDI hardware, and save your creations.
Core Concepts
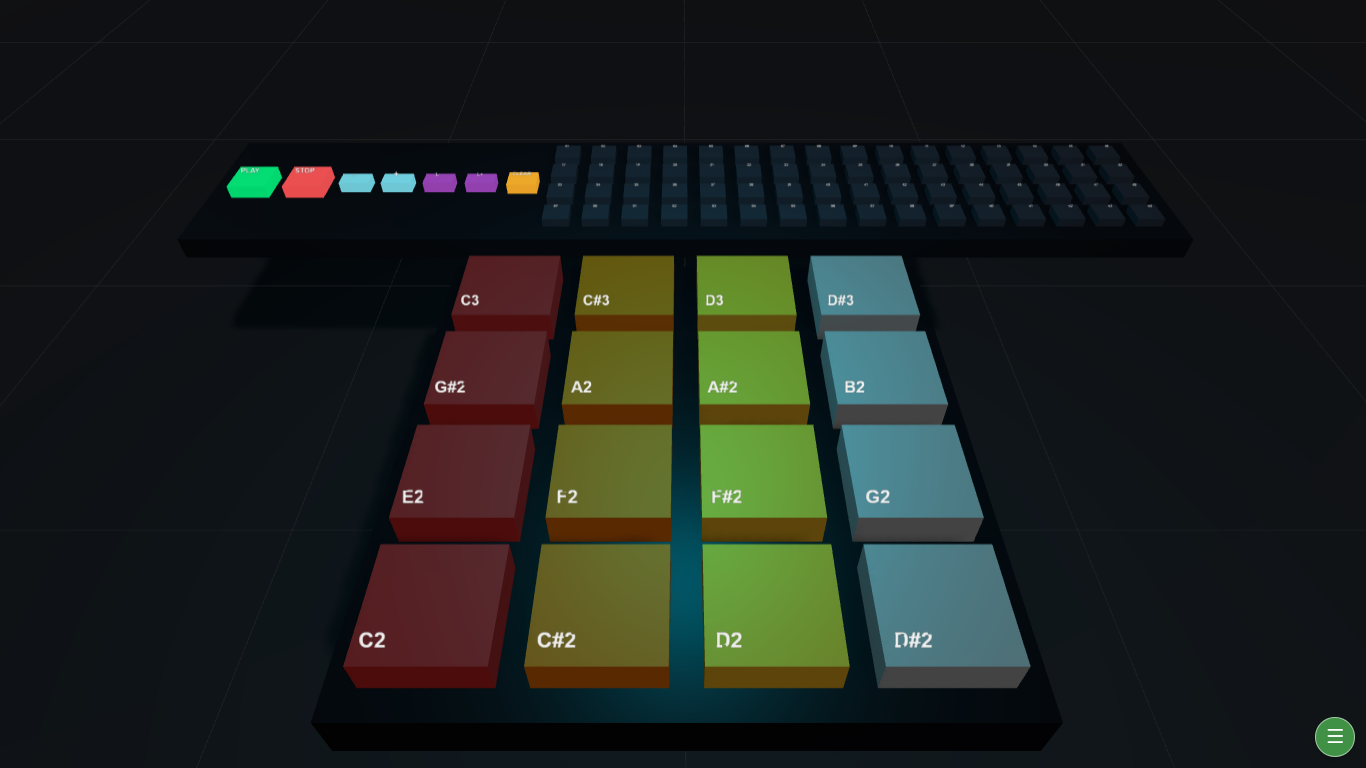
The interface has two main interactive parts in the 3D scene:
- The MIDI Controller: The 4x4 grid of pads at the front. You can click these to play notes instantly.
- The Sequencer: The long panel behind the controller with 64 step buttons. This is where you build your musical loops.
All other controls are in the menu at the top left of the screen.
Making Music: Your First Beat
1. Playing Notes Manually
Simply click any of the 16 large pads on the front controller. Each pad will light up, play a note, and send a MIDI message if an output is configured.
2. Building a Sequence
This is a two-part process: arming a note, then placing it on the sequencer.
- Arm a Note: Right-click (or long-press on touch devices) on one of the 16 controller pads. The pad will start pulsing, and the "Armed Note" display in the top-left corner will show which note you've selected.
- Place the Note: Click on any of the 64 small step buttons on the sequencer panel. The step will light up with the color of the armed note, indicating it's now part of the sequence. You can place the armed note on as many steps as you like.
- Toggle Steps On/Off: If you click a step without a note armed, it will simply toggle that step's default note on or off.
- Clear the Armed Note: To stop assigning notes, right-click the armed pad again or right-click any empty space.
3. Playing Your Sequence
- Find the PLAY and STOP buttons on the left side of the sequencer panel in the 3D scene.
- Click PLAY to start the sequence. A turquoise playhead will move across the steps, triggering the notes you've activated.
- Click STOP to halt playback and reset the sequence to the beginning.
Controlling the Vibe
- Adjusting BPM: Use the
+and-buttons next to the PLAY/STOP controls on the sequencer, or type a value directly into the BPM input field in the main menu. - Changing Loop Length: Use the
L+andL-buttons on the sequencer or the "Loop Length" input in the menu to set how many steps the sequence plays before looping. The maximum is 64 steps. - Clear the whole sequence: The CLEAR button on the sequencer will turn off all steps, giving you a blank slate.
Connecting Your Gear (MIDI)
You can find all MIDI controls in the menu in the top-left corner.
- Setup: Use the "MIDI Input" and "MIDI Output" dropdowns to select your connected hardware. You can also select specific MIDI channels for input and output (1-16).
- Panic Button: If you ever have "stuck" notes playing on your external synthesizer, the PANIC button will send an "All Notes Off" message to quiet things down.
- MIDI Sync: This lets you synchronize the app's timing with external hardware.
- Off: The default mode. The sequencer runs on its own internal clock.
- Internal: The app becomes the "master." It sends MIDI Clock, Start, and Stop signals from its output port to control your other gear.
- External: The app becomes a "slave." It will listen for MIDI Clock, Start, and Stop signals from your selected input device and play in time with that.
Saving & Loading Your Creations
In the menu, you'll find the pattern controls.
- Save: Type a name into the "Pattern Name" field and click Save Pattern. This saves the current BPM, loop length, and all the notes in your sequence.
- Load: Choose a pattern from the "Load Pattern" dropdown and click Load Selected.
- Delete: Select a pattern from the dropdown and click Delete Selected.
Navigating the Scene
- Rotate/Zoom: Click and drag with the left mouse button to rotate the view, and use the scroll wheel to zoom in and out.
- Lock Camera: The Lock/Unlock Camera button in the menu freezes the rotation, which is useful during performance.
Leave a comment
Log in with itch.io to leave a comment.